I've been working on building a chair since April 2015. It's a very simple design as such, but being my first woodworking experience, the process seems very complex to me, so far.
I started off with making some freehand sketches of chairs. I worked on the details of some of these designs, in the process eliminating them on the basis of factors like difficulty level and aesthetics.

One of my fellow woodworkers told me it was best to make a design that I could use in my home, and this advice was a blessing, for it made it very easy to select my final design. This sofa-chair is what I decided to work on.


This design, although seemed very simple to me initially, was a little overwhelming.
Making a curved hardwood backrest seemed like a challenge. It would require either cutting many pieces and joining them together, or steam-bending the wood. Since the backrest was tapered and at an angle, steambending would not be as simple, it would require a lot of thinking and precise numbers.
Another option was to use bent lamination for the backrest.
A third option was to alter my design. This looked like the best thing to do. I quickly made a slight alteration to my original design (see the hand sketch below) and the same day made a model, to get a better understanding.

I was very happy with this design on the first two days. Then I decided to incorporate it in a new model. I changed the seat shape, from curved to quadrilateral (so it matched my backrest.) After I made this model, something just didn't feel right. I wasn't excited about this design.
PICTURE TO BE UPLOADED SOON
Moto suggested I make a mock piece of the backrest to see how it looks. I used a smaller piece of wood and used the scroll-saw to make the cutouts. It was a fun, time-taking experience. I enjoyed using the scroll-saw and ended up breaking three blades :( But the final piece, although imperfect, was very satisfying.
PICTURE TO BE UPLOADED SOON
I think sleeping over the design was a great idea. I realized that I found the backrest to be too busy. This is when I decided to skip the cut work and keep it simple, I started drafting the final design on SketchUp and came up with three similar, but slightly varying options.

I stuck with option two (the one with the grey cushion.) At this point, I got precise dimensions for my final chair design and was prepared to buy wood.

Even before I went to the hardwood store, I knew I liked walnut and Moto had given me the go-ahead for it, saying it was not very hard or soft, and is a good choice for making a chair. At the lumberyard, I loved this slab of walnut. Bought it the same day!

The first step after buying the wood was to run it through the planer - to make sure the wood is of equal thickness from end to end. I ran it through the planer on both sides for a couple of times. After that, I ran one long edge through the jointer, to get an even, square surface to start off cutting.
I decided to cut one long edge for the seat frame, this was my first cut on the table-saw and I was VERY nervous. With Moto's help, the cut went smoothly. I then started drawing full size templates on white paper, to use for drafting on the wood. The two front legs, two rear legs and back rest, arm-rests and back support. I avoided the cracked part of wood by placing the tapered edges of the legs on either side.
Since I wanted to accommodate all my pieces on the slabs, it was not possible to use the table saw to cut them out. I used the bandsaw to cut each amoebic shape separately and then used a combination of the table saw and chop saw to cut identical pieces. I then used the double sided tape to glue the identical legs together and ran its edges through the planer, ensuring they are exactly the same in width.
It was now time to start working on the joinery. For the chair seat, I was using the 'Bridle Joint' (Through Mortise & Tenon Joint,) which looks like this:

Since my chair seat tapered towards the back and had angles, I had to create two 10° and 5° angular wedges to use as a reference for cutting out the mortises and tenons. After doing that, it made sense to first make a practice piece, which I did, with spare wood. This is how it looked.

And here is the actual piece:

The excess mortise and tenons will be sanded off towards the end. It was a safety step to make sure they don't run short. Like they say, it's better to have extra than to run short.
For the compound cut, I created a 15° wedge to place the backrest against. We then tilted the blade to 42.5° (the armrests flared out at 5°, we divided this by two -2.5° and subtracted that from the 45° mitered edge.) With this too, Lee was okay with me making a practice piece, which I successfully did. Here's what the mini backrest-armrest looked like:

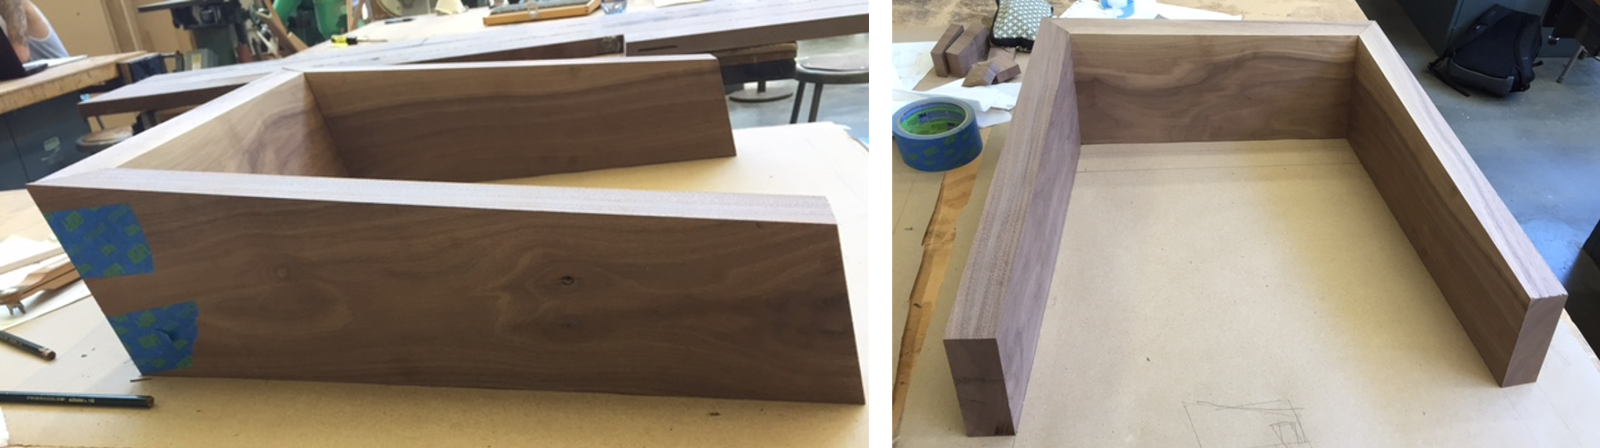
After the practice piece, I cut my actual backrest. When it came to the armrest, I realized it was not a 90° edge, so once again, I made a small angular jig to reference it against and cut my mitered joints. Here is a pic of the actual pieces, cut and unglued.

It was now time to work on more joinery details. I planned to use the Blind Mortise & Tenon Joint for joining the rear legs to the seat and the front legs to the arms. For joining the front legs to the seat, I was going to use the Half Lap Joint.
I started off with making the mortises on the seat (for the rear legs.) It was simpler than I expected. I then created my next two mortises on the arms for the front legs. Then, I separated the glued on legs and made tenons on them. Not to mention, these legs were at different angles and required me to use my previous angular wedges to straighten them while making the tenons.
I spent a lot of time on the tenons. Each tenon had to be cut in 4 steps and with the 2 pairs being at different angles, I could make only two legs at a time.
To start off, I used my angular wedges and the sled on the table saw for making the wide shoulder cut on each side of the leg.
After the shoulder, I used the tenon jig along with clamped wedges to cut off the face cheek which ran at an angle.
Step 3 was to saw the the shorter shoulders, again on the sled and step 4 was to take off the edge cheek on the tenon jig, again, with clamped wedges.
So you see, each step required me to change from the sled to the tenon jig and clamp or nail the angled wedges as reference for the cutting. It was tiring, frustrating and really tested my patience. In the end, however, I felt very happy and satisfied with the results.
For those of you who don't understand the above terminology, here is an image showing the different parts of a tenon:

I was almost done with the chair by now (or so I thought!)
We moved to the next step of gluing together the backrest and armrests, when I realized I was yet to make tenons and mortises for my back support. Lee said it would be better to do it after gluing the backrest so that I could get an accurate angle at which the shoulders of the back support can be cut. I also cut the extra meat of wood on the backrest, towards the bottom, so that the grain pattern would match at the top. 
I was almost done with the chair by now (or so I thought!)
After cutting all my mortises and tenons, I moved on to making the lap joint on the seat and front legs. This was fairly simpler, but required accuracy in terms of angles and placement. They had to be mirror images on the two sides of the chair and legs, requiring a lot of angular jigs on the sled, being used interchangeably on both sides. The legs came out fine, but I made a mistake with the seat. Instead of making mirror image angled lap cuts, I made similar lap cuts on both sides. It's good to make mistakes, cos it taught me how to make fixes. I had to glue on a piece of wood to the cut lap, let it dry and then re-cut the lap on the seat. This time, it came out perfectly and fit well.
Here is a pic of the glued backrest. This was almost done and all I needed was to make the splines to strengthen the joint.
.......
........More updates will be posted as and when I can!
No comments:
Post a Comment